Workflow coordinate
Creation Date: Aug 29, 2024
Created By: VNPT eContract's team
When to use workflow coordination feature?
In situations involving sequential agreements with multiple partners, the document creator may not be fully aware of each party's workflow and may need someone else to supplement the list of recipients for processing. In this case, the coordinator will receive notifications and add the list of recipients at the positions designated by the creator, helping the document to be completed and processed until the entire workflow is finalized.
The "Coordinate" permission is only available when documents are processed sequentially.
How to set up a document workflow designating recipients with "Coordinate" rights?
When creating documents with a sequential processing flow, the creator can add recipients with coordination rights to the document processing flow. The position of the designated coordinator is crucial, as it determines their rights to operate within the processing flow.
1. Setting up the workflow when creating individual documents
When creating a document by uploading a file or creating a new document from a template, the creator assigns "Coordinate" rights to the workflow through the following steps:
- Step 1: Create the document
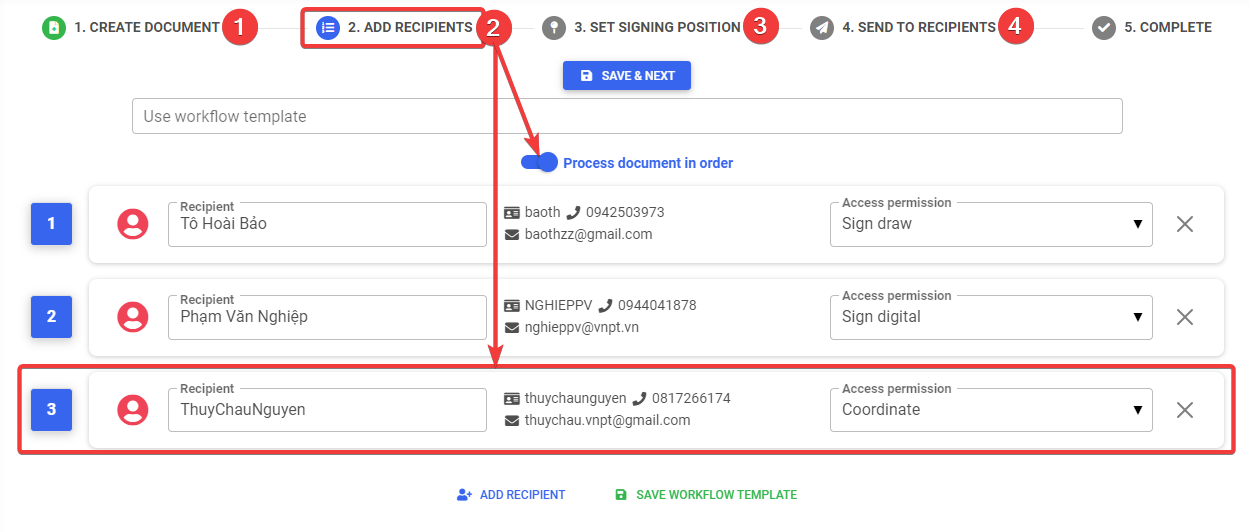
- Step 2: Add recipients. Here, the creator designates recipients with "Coordinate" rights at the desired position.
- Step 3: Set signing position (if any).
- Step 4: Send to recipients
2. Setting up the workflow when creating documents via batch import
The creator assigns "Coordinate" rights to the workflow when importing a batch of documents by following these steps:
- Step 1: Open the "Batch document import" window
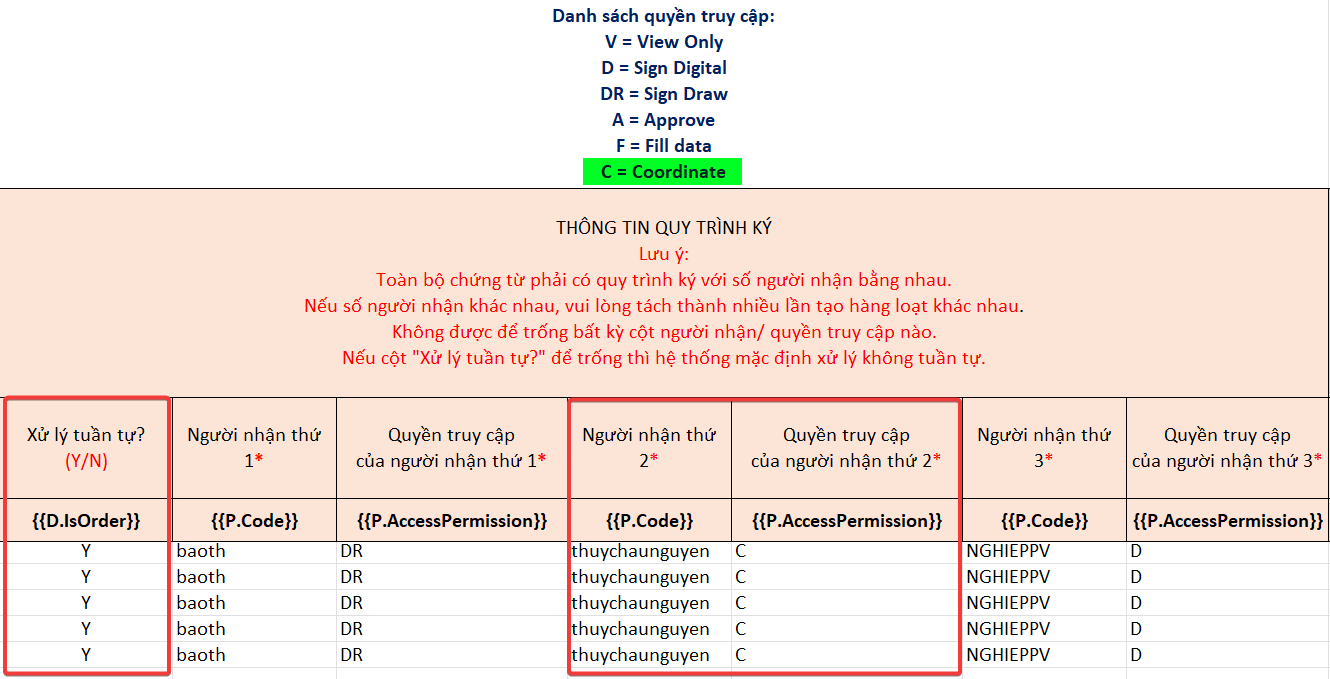
- Step 2: Download and fill in the Excel template for creating the batch of documents. Here, the creator assigns a recipient with "Coordinate" rights at the desired position in the workflows of the document batch.
- Step 3: Create the new batch of imported documents
- Step 4: Send to recipients
3. Positions for designating "Coordinate" rights when setting up document creation processes
3.1. Start position of the workflow
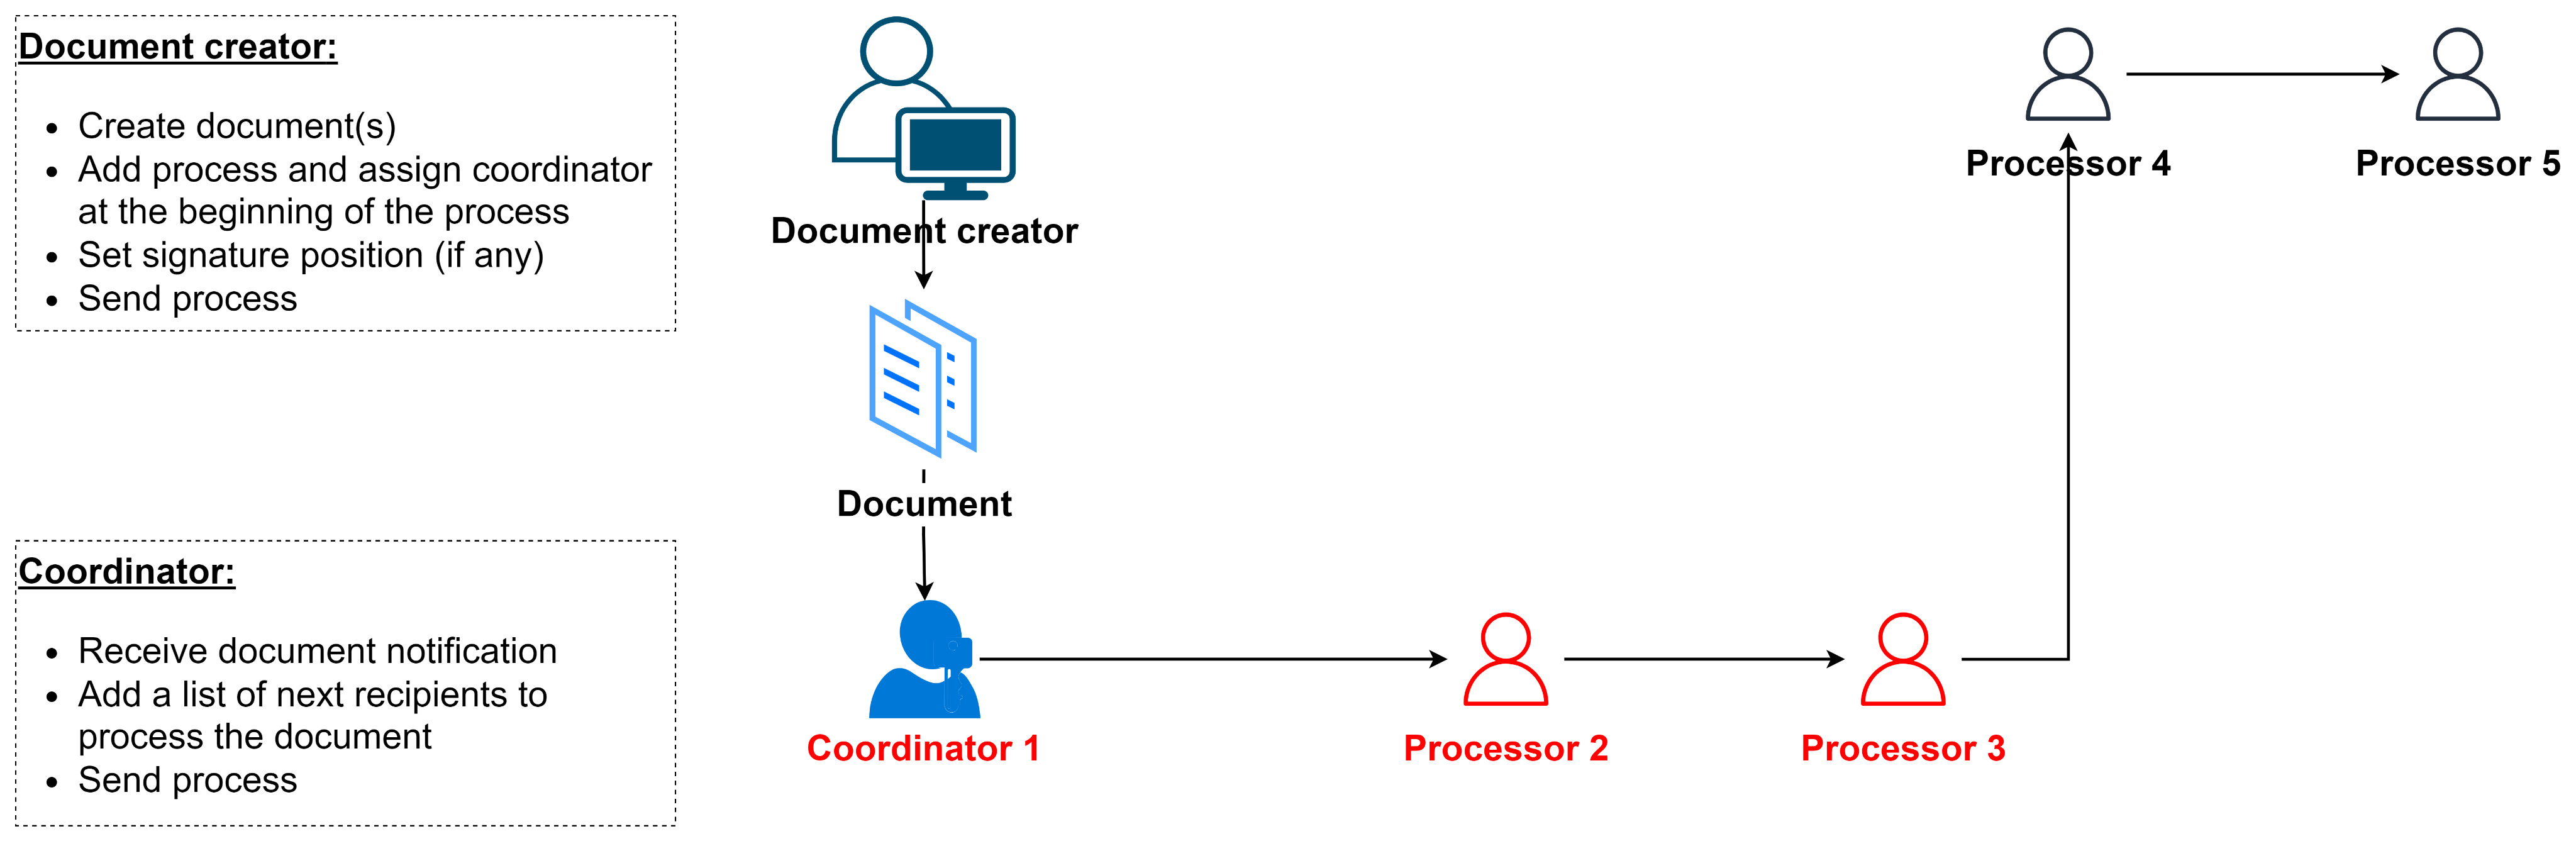
Workflow diagram

In the diagram above, the document creator only knows the information of Processor 2 and Processor 3 but is unaware of those at the start position of the workflow. The creator will designate a recipient with "Coordinate" rights at the start position of the workflow, before Processor 2 and Processor 3.
Setting up the workflow when creating individual documents
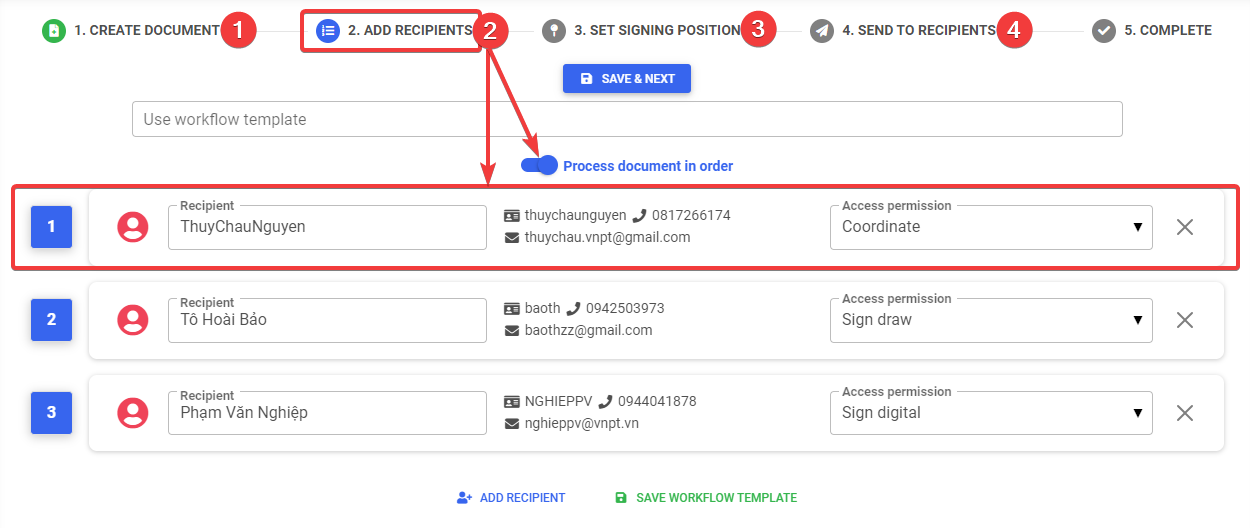
In Step 2 - "Add recipients", the creator sets up the sequential workflow and designates a recipient with "Coordinate" rights at the first position in the workflow and proceeds with the next steps to finalize the creation and sending of the document workflow.
Setting up the workflow when creating individual documents
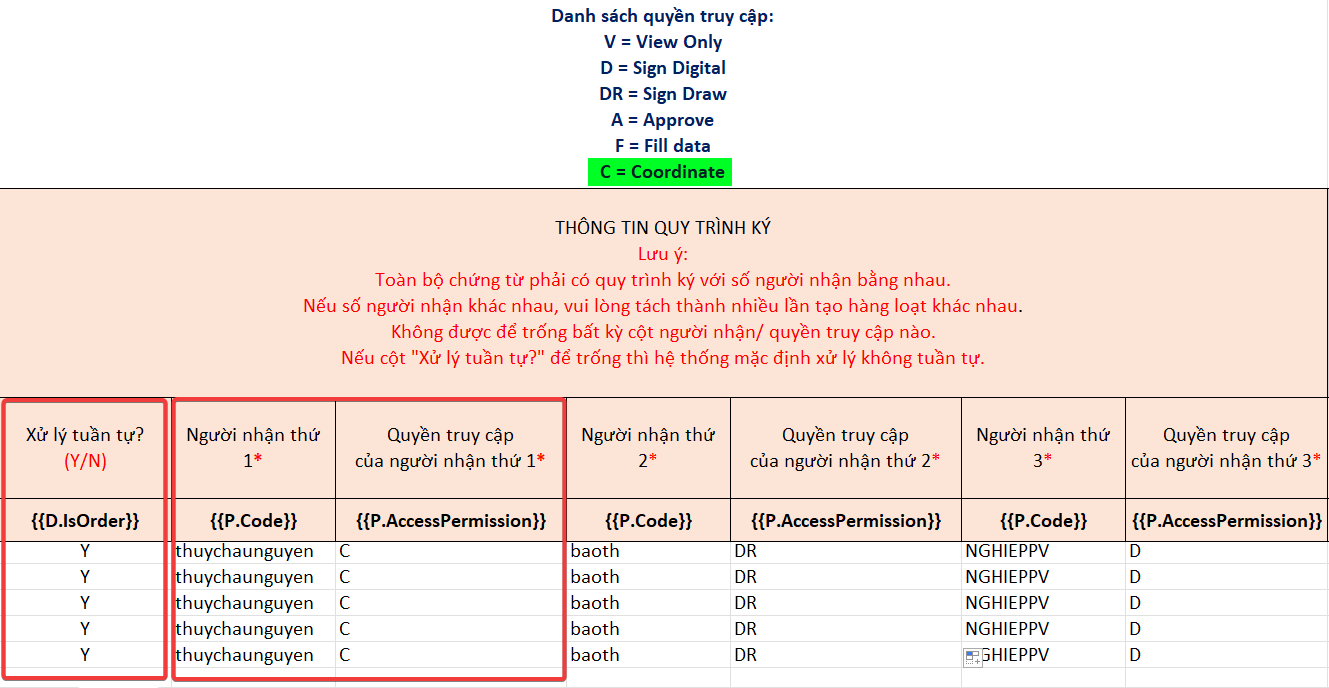
In Step 2 - Download and fill in the Excel template for batch document creation, the creator sets up the sequential workflow and assigns a recipient with the "C" right, which is the "Coordinate" right, at the first position in each workflow and follows the next steps to complete the creation and submission of the batch document workflow.
3.2. Position in the middle of the workflow
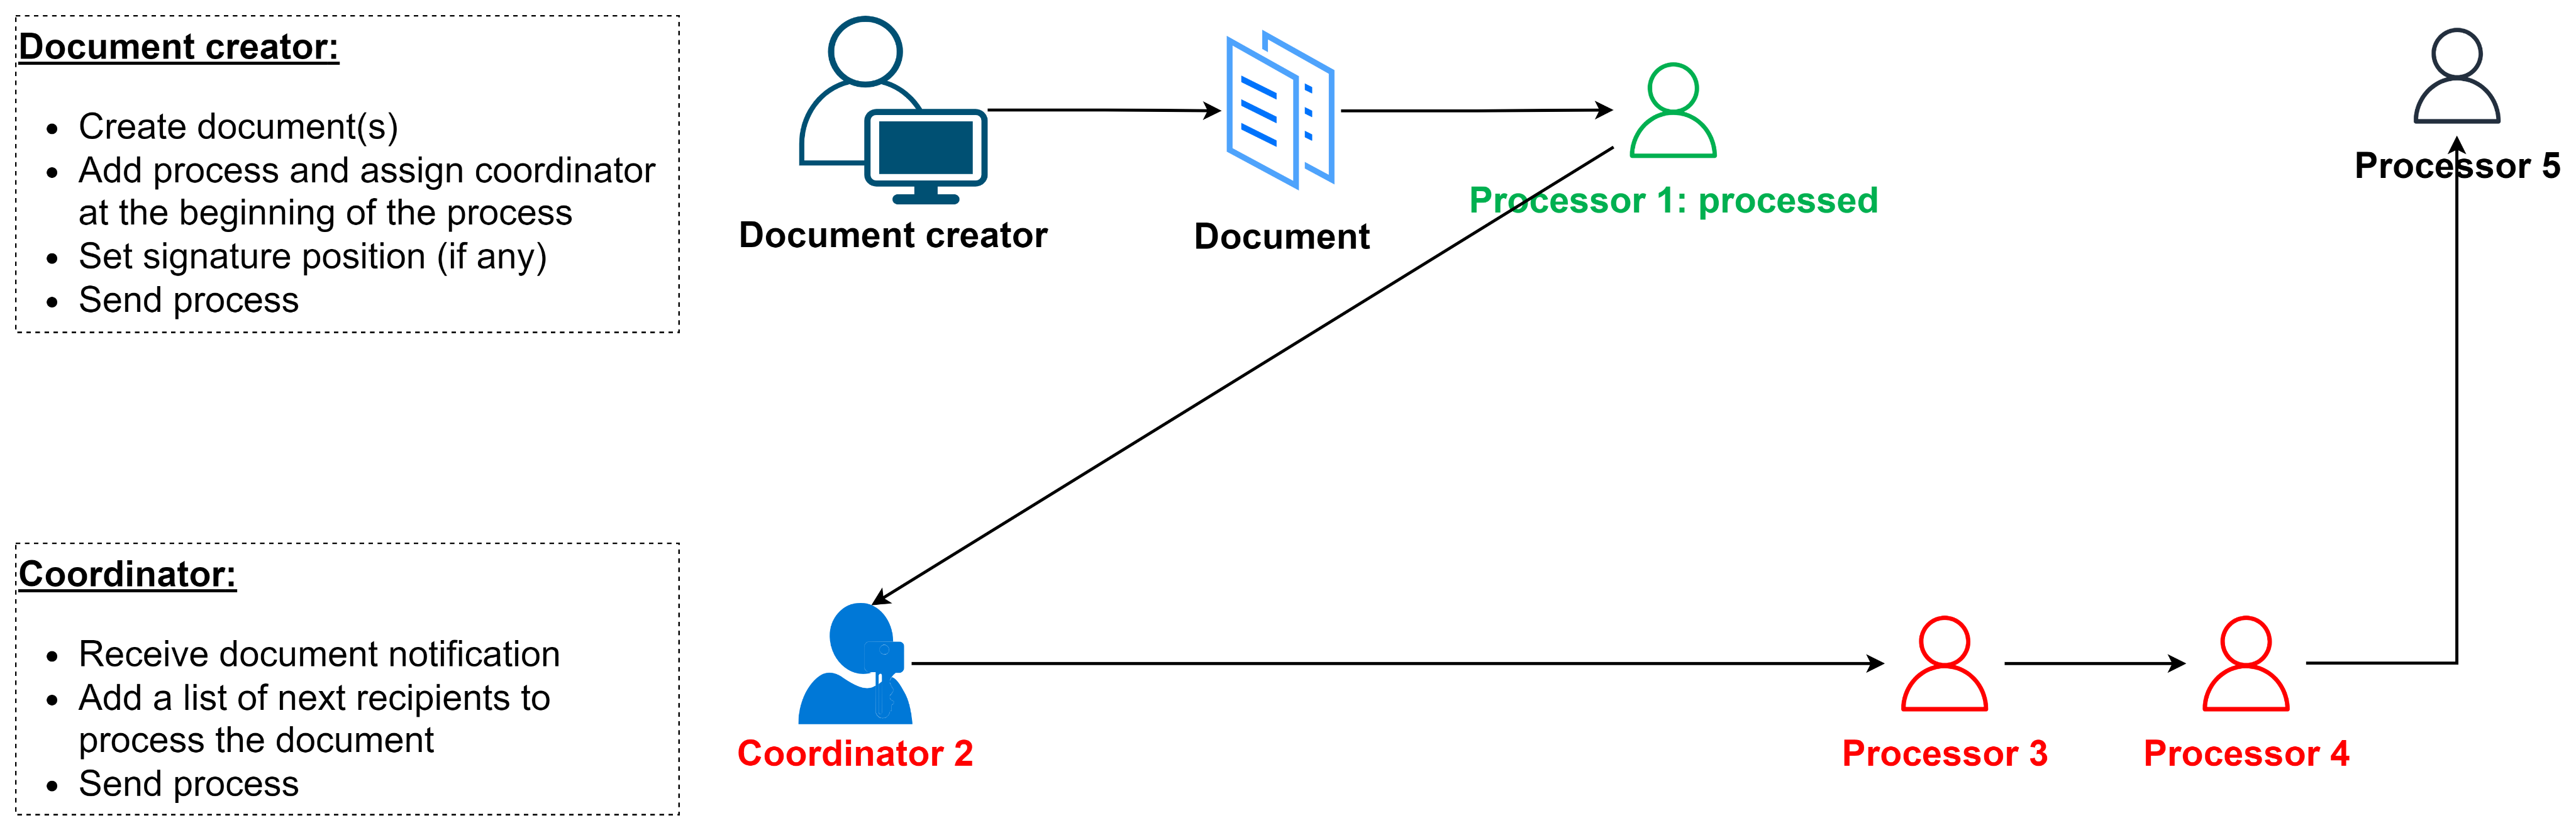
Workflow diagram

In the above workflow diagram, the document creator only knows the information of Processor 1 and Processor 3, without knowing the information of those in the middle of the workflow. The creator will assign a recipient with "Coordinate" rights in the middle of the workflow, between Processor 1 and Processor 3.
Setting up the workflow when creating individual documents
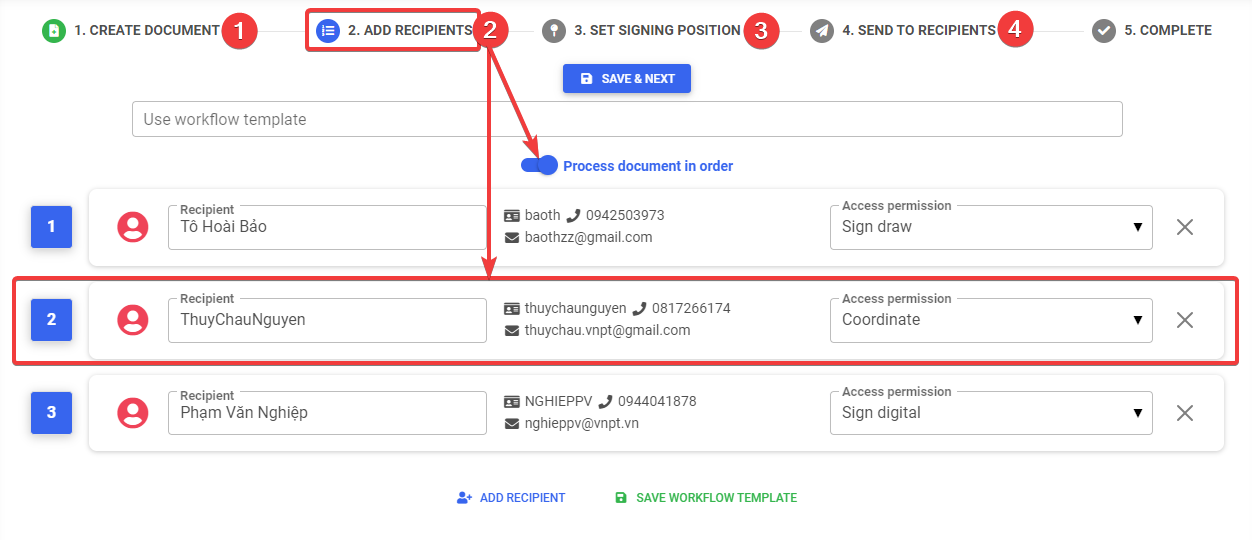
In Step 2 - "Add recipients", the creator sets up the sequential workflow and assigns a recipient with "Coordinate" rights in the middle of the workflow and follows the next steps to complete the creation and submission of the document workflow.
Setting up the workflow when creating documents via batch import
In Step 2 - Download and fill in the Excel template for batch document creation, the creator sets up the sequential workflow and assigns a recipient with "C" rights, which is "Coordinate" rights, in the middle of each workflow and follows the next steps to complete the creation and submission of the batch document workflow.
3.3. Position at the end of the workflow
- Workflow diagram
 In the above workflow diagram, the document creator only knows the information of Processor 1 and Processor 2, without knowing the information of those at the end of the workflow. The creator will assign a recipient with "Coordinate" rights at the end of the workflow, after Processor 1 and Processor 2.
Setting up the workflow when creating individual documents
In Step 2 - "Add recipients", the creator sets up the sequential workflow and assigns a recipient with "Coordinate" rights at the end of the workflow and follows the next steps to complete the creation and submission of the document workflow.
Setting up the workflow when creating documents via batch import

In Step 2 - Download and fill in the Excel template for batch document creation, the creator sets up the sequential workflow and assigns a recipient with "C" rights, which is "Coordinate" rights, at the end of each workflow and follows the next steps to complete the creation and submission of the batch document workflow.
When the document creator is also the workflow coordinator, they have the authority to decide the next steps, except for the list of recipients that have already been processed. The coordinator can add, update, or change the order of the unprocessed recipients list to align with their requirements and objectives
Responsibilities of the Coordinator
After receiving notifications via email/SMS, the coordinator will be able to access the document and provide the missing recipient information or choose "Complete and Send" if there are no changes in the workflow. The document will continue to be sent to the next recipient, in processing order, or complete the workflow if no changes are added to the workflow.
1. Coordinating the workflow at the designated position
The coordinator has the right to add a list of recipients to the document processing workflow according to the designated position.
Steps to follow:
- Step 1: Click "Wait coordinate" or click on the link or processing code received via email/SMS to access the document detail screen.
- Step 2: Review the document processing flow and click "Coordinate".
- Step 3: On the "Add recipients" screen, the coordinator adds the list of next recipients at the designated position and clicks "Save & Continue".
- Step 4: Click "Save & Continue" to add the signing position (if applicable).
- Step 5: Click "Send to recipients" to send the document to the next processor.
1.1. Start position of the workflow
Workflow diagram
The role of Coordinator 1 is to add the list of people who need to workflow and send the document. After these recipients workflow the document, it will be forwarded to Processor 4 and Processor 5 (the two recipients previously designated by the document creator).
Performing workflow coordination
1.2. Middle position of the workflow
Workflow diagram
After Processor 1 completes their processing, the document will be sent to Coordinator 2. The role of Coordinator 2 is to add the list of recipients who need to workflow next - after Processor 1 and before the final Processor - and send the workflow. After these recipients complete their processing, the document will be forwarded to Processor 5 (the final processor previously designated by the document creator).
Performing workflow coordination
1.3. End position of the workflow
Workflow diagram
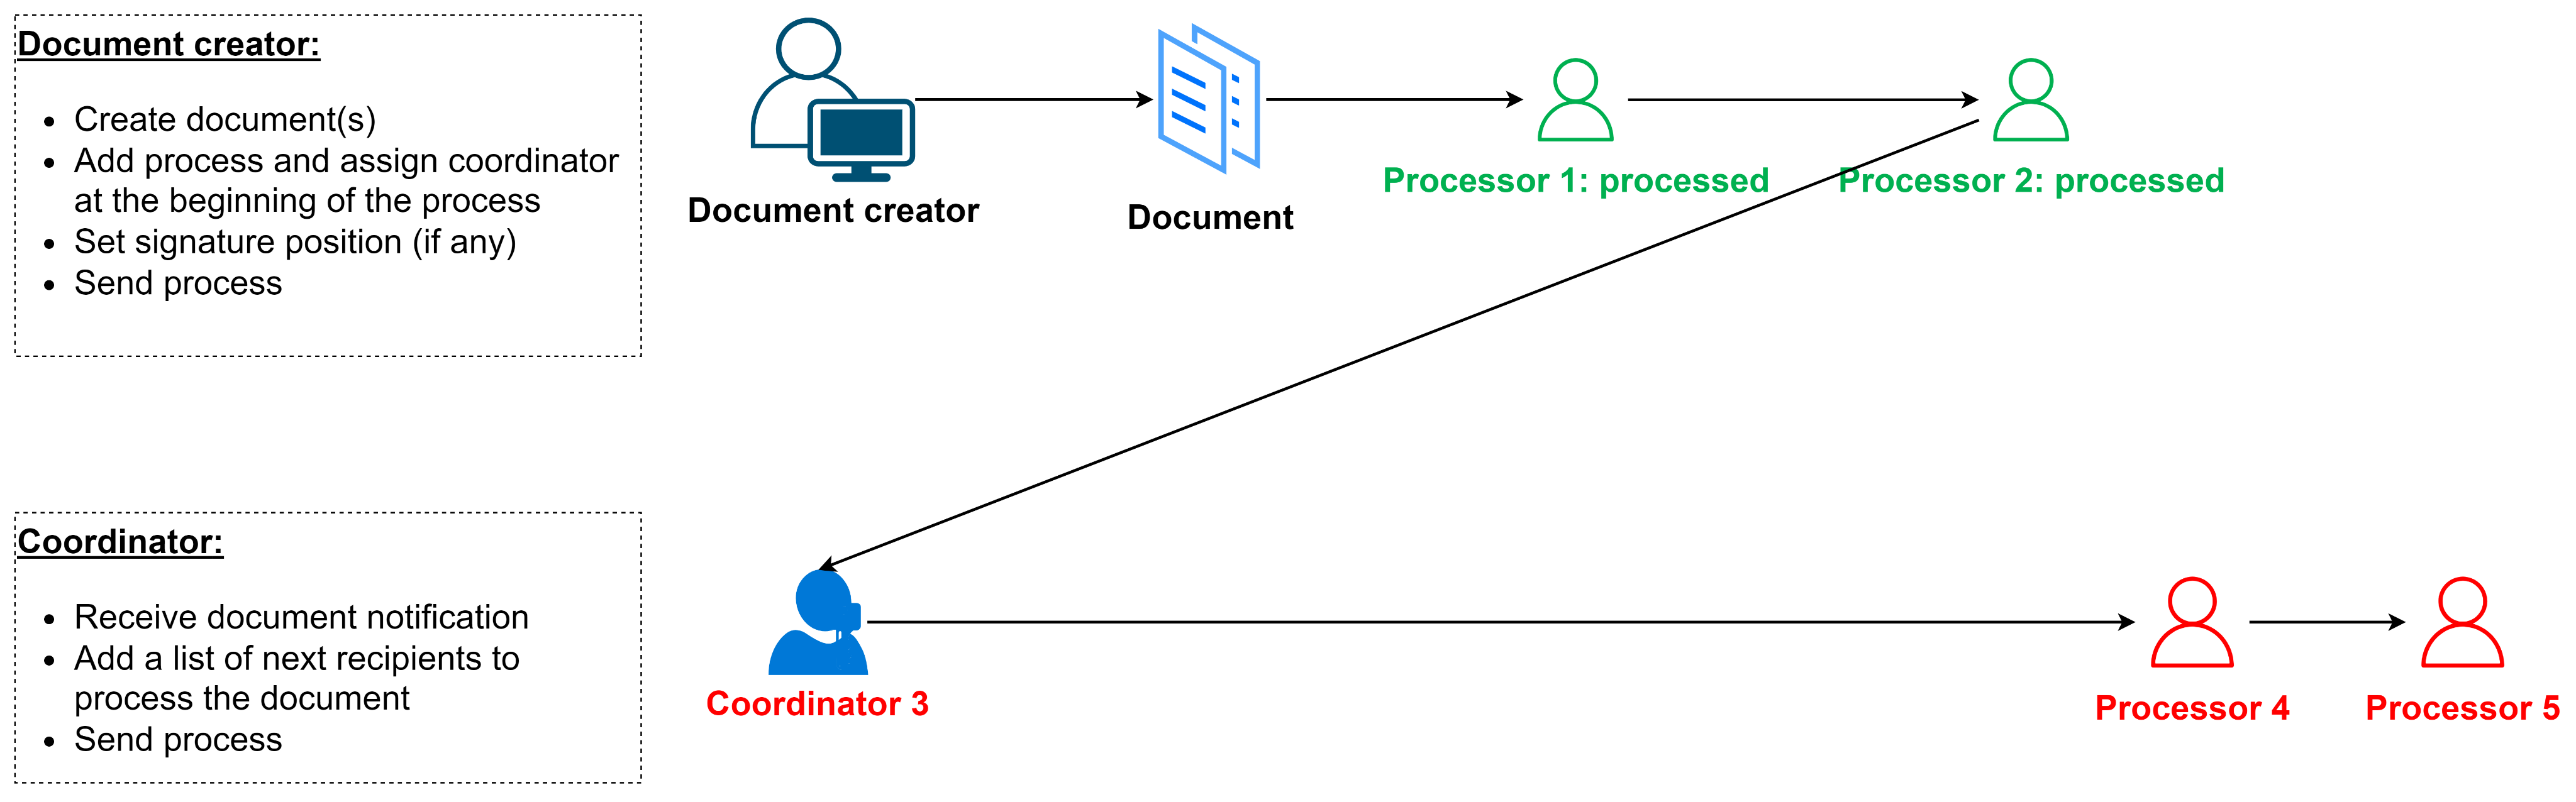
The role of Coordinator 3 is to add the list of final recipients and send the document to them. Once these recipients complete their processing, the document will be finalized.
Performing workflow coordination
2. Completing and Sending to recipients
If the coordinator has no changes in the workflow, click "Complete and Send" to send the workflow to the next recipient or finish the document processing (if the coordinator is the processor at the last position of the workflow).
Steps to follow:
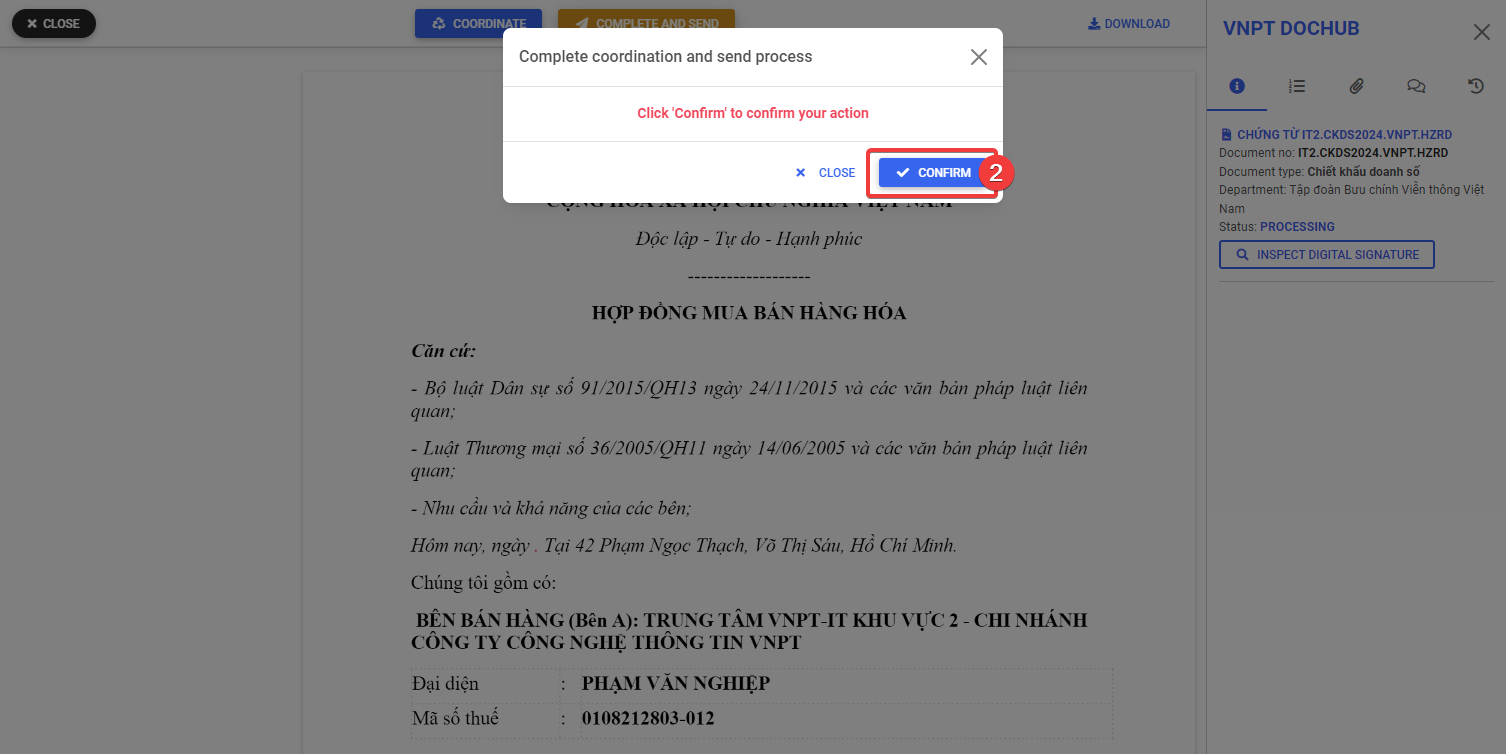
- Step 1: On the document detail screen, review the processing flow. If there are no changes, click "Complete and Send".
- Step 2: Click "Confirm" to finalize the coordination and send the workflow.