Configuration of data fill parameters in document templates
Creation Date: May 01, 2024
Updated by: VNPT eContract's team
This feature allows users to configure placeholder parameters in document templates. It helps users customize various parameter settings such as display formatting, definition, and configuration of parameters within the template.
1. Preparing the Word Template File (.docx)
- Create the document template content in MS Word (.docx format).
- At the position where data needs to be entered, insert a placeholder parameter (syntax depends on the parameter type).
- Declare the parameter configuration table at the end of the Word file so the system can recognize the data type.
2. Naming parameters
2.1 Basic parameters
Basic parameter naming syntax:
{{parameter_name}}Explanation:
{{}}: curly brackets enclosing the parameter.parameter_name: the parameter name, written continuously, no accents (use_to separate words if needed).
The formatting of the parameter in Word (bold, italic, color…) will be preserved after the data is filled.
2.2 Advanced parameters – Conditional expressions (If/Else)
- If with a basic expression
- Meaning: Display content when the condition is true.
- Syntax:
{?{Condition}} Content when condition is true {{/}}
- Example:
{?{Number >= 0}}Value {{Number}} meets condition{{/}} - Explanation:
- If Number ≥ 0 → displays: “Value X meets condition”
- If Number < 0 → nothing is displayed.
If with combined expressions
- Meaning: Display content when multiple conditions are true (using
&&or||). - Syntax:
{?{Condition1 && Condition2}} Content when both conditions are true {{/}}
- Example:
{?{Age >= 18 && Note.Contains('Agree')}} {{Age}} years old has agreed, content '{{Note}}'{{/}} - Explanation:
- If Age ≥ 18 and Note contains "Agree" → displays the information.
- If one of the conditions is false → nothing is displayed.
If with else
- Meaning: Display one content when the condition is true, and another content when the condition is false.
- Syntax:
{?{Condition}} Content if true {{:}} Content if false {{/}}
- Example:
{?{Number >= 0}} Value {{Number}} meets condition {{:}} Value {{Number}} does not meet condition {{/}} - Explanation:
- If Number ≥ 0 → “Value X meets condition”
- If Number < 0 → “Value X does not meet condition”
- Logical expressions:
==,!=,>,<,>=,<=- Example:
{?{Age >= 18}} Adult {{:}} Underage {{/}}
- Example:
- String comparison:
Contains,StartsWith,EndsWith- Example:
{?{Name Contains "An"}} Name contains "An" {{:}} Does not contain "An" {{/}}{?{Code StartsWith "VN"}} Vietnam country code {{:}} Other country code {{/}}{?{Email EndsWith "@gmail.com"}} Gmail {{:}} Other email {{/}}
- Example:
- Combining multiple conditions:
&&,||- Example:
{?{Age >= 18 && Country == "VN"}} Adult in Vietnam {{:}} Other {{/}}
- Example:
2.3 Advanced parameters – Image type (img)
When inserting an image into the template using the :img syntax, you can specify the width (w) or height (h). If only one value is specified, the system automatically calculates the other to maintain aspect ratio.
Supported units:
cm= centimetersmm= millimetersin= inchespx= pixels
Syntax:
{{Param}:img(w:ValueUnit, h:ValueUnit)}
- Examples:
- Specify both width and height:
{{Logo}:img(w:50mm, h:50mm)} - Specify only height:
{{Logo}:img(h:30cm)} - Using pixels:
{{Logo}:img(w:200px)} - Using inches:
{{Logo}:img(w:2in)}
- Specify both width and height:
2.4 Advanced parameters – Assigning data fill roles
To specify exactly who is allowed to enter data into a field before the document is signed/approved, use the following syntax:
{{fn.parameter_name}}Explanation:
{{ }}: curly brackets enclosing the parameter.parameter_name: the parameter name, written continuously, no accents (use_if needed).fn.: prefix to specify the data entry person.nis a natural number{0,1,2,...}representing the order of the person filling in the data in the process.
Examples:
- Contract number:
{{f1.ContractNo}}→ The first person enters the Contract number - Signing date:
{{f2.SignDate}}→ The second person enters the Signing date
- Contract number:
3. Setting up signature frames
Used when the template creator wants to predefine positions and sizes of signature frames. If you don’t want predefined signature frames, you can skip this step. Setup method:
Use
Insert -> Text Box -> Draw Textboxin MS Word to draw a signature frame in the required position.
Naming structure for signature frame markers:
[[sx]]
- Explanation:
- Each signature frame marker is enclosed in double square brackets:
[[]] sis a constant and must not be changed. Case insensitive.xis a natural number {1, 2, ...n}, where n is the total number of signature frames in the template. Each signing position requires a corresponding numbered frame. For example: frame[[s1]]is for the first signer,[[s2]]for the second signer, etc.
The size of the signature frame in the Word template will be the display size in the signing interface.
To align the frame marker, place it in the middle of the text box. Use "Middle Align Text" in Shape Format and "Center Alignment" (or shortcut Ctrl + E).

Avoid using spaces or enters to adjust frame marker position, as this may cause misalignment or prevent recognition. Use "Show/Hide Formatting Marks" in Word to check and remove unnecessary spaces/enters.
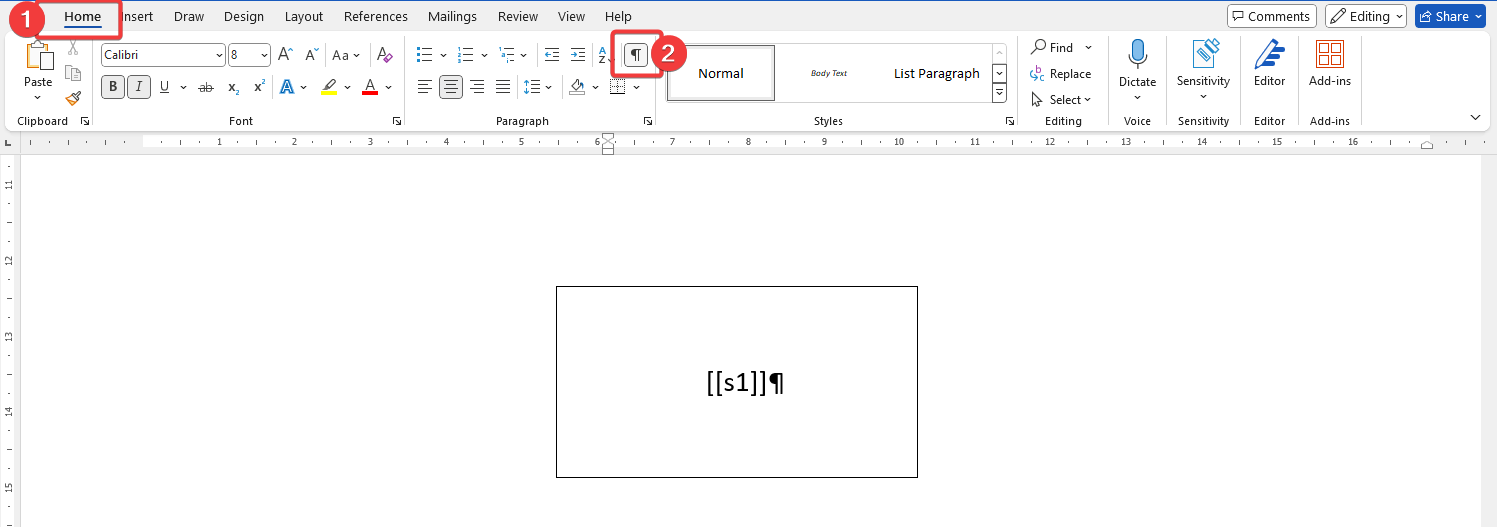
- Example of configured signature frames in a template file

4. Parameter configuration table
- Example of placeholder parameters:
SERVICE CONTRACT

Contract No: {{ContractNo}}

Party A: {{SellerName}}
Party B: {{BuyerName}}

Company Logo: {{Photo}:img(w:50mm,h:20mm)}

Content: Party A provides service {{ServiceName}} valued at {{Price}} VND.

Terms:
{?{Price >= 10000000}}Service includes 12 months free maintenance{{:}}Maintenance fee will be charged separately{{/}}
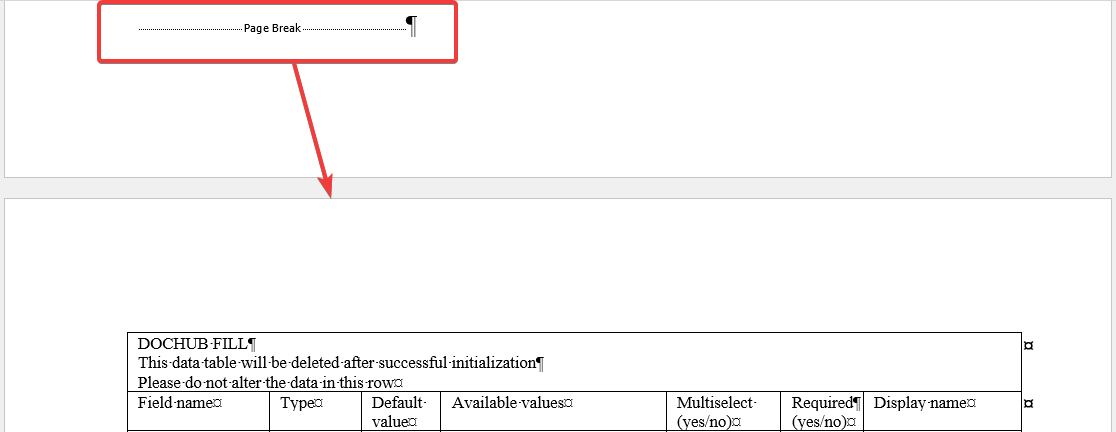
- Example configuration table:
| Field name | Type | Default value | Available values | Multiselect | Required | Display name | Extra config |
|---|---|---|---|---|---|---|---|
| ContractNo | text | No | Yes | Contract Number | |||
| SellerName | text | No | Yes | Party A | |||
| BuyerName | text | No | Yes | Party B | |||
| Photo | img | No | No | Company Logo | |||
| ServiceName | text | No | Yes | Service Name |
- Explanation:
Field name: the parameter name inside curly brackets.Type: data type. Supported types:text: for text or numeric values.list: for tables or list values.select: for single/multiple selection options.checkbox: for multiple checkbox selections.img: for images.
Default value: the parameter’s default value if not filled. Leave blank if none.Available values:- For
text: not required. - For
list: the table columns or list rows. - For
selectandcheckbox: the selectable values configured.
- For
Multiselect: Yes/No. Default = No.Required: Yes/No. Default = No.Display name: human-readable name of the parameter.Extra config: allows extended config (e.g.barcode).
- If no configuration table is declared, the parameter defaults to text. However, conditional expressions only require correct syntax, no table declaration needed.
- Place the configuration table on the last page of the template and add a “Page break” before it to prevent data overflow.
5. Download sample templates
Download the documents template for reference here