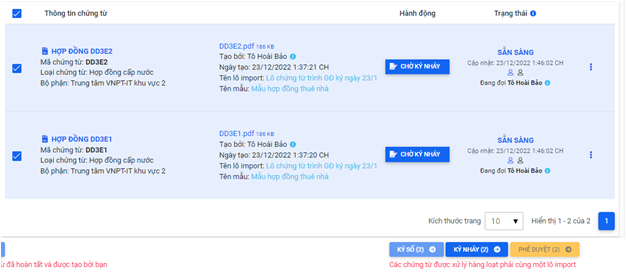
Create batch import
Updated date: 07/07/2026
Updated by: VNPT eContract's team
Allow creating document batches based on templates with placeholder data. The process of creating a document batch includes the following steps:
- Step 1: Prepare a template file containing the necessary placeholders
- Step 2: Upload the template file and configure it
- Step 3: Prepare data for creating the document batch from the template
- Step 4: Call the API to create the document batch from the template
- Step 5: Initiate the signing process
Use this guide when the customer system needs to create many documents with the same template structure, but each document has different values such as document number, subject, recipient, signing order, and template placeholders.
Before integration
Prepare the following information before building the batch import request:
| Item | Description |
|---|---|
| Account and token | API account used to call the login API and obtain a Bearer token for all subsequent requests. |
| Document template | A .docx template already uploaded and configured in VNPT eContract. Keep the documentTemplateId. |
| Template placeholders | Placeholder names in the template, for example {{ben_a}}, {{ben_b}}, or {{#items}}. These names must match the values passed in parameters. |
| Master data | departmentId and documentTypeId, retrieved from the corresponding department and document type APIs. |
| Recipients | User codes used in {{P.Code}}. Confirm that each user exists and has the required signing/approval method configured. |
| Batch data source | The customer system should prepare one row per document. Each row must have the same number of values as the parameters list. |
| Send strategy | Decide whether to create the batch only for review first, or create and then immediately call the send batch process API. |
API sequence for developers
| Step | API / action | Input to prepare | Output to keep / next action |
|---|---|---|---|
| 1 | Login | API username/password. | Store the access token and send it as Bearer token. |
| 2 | Upload/configure document template | Template .docx, signature positions, and placeholder configuration. | Store documentTemplateId. |
| 3 | Get template detail | documentTemplateId. | Check fillableFields to confirm placeholder names. |
| 4 | Get department and document type | Search/filter master data if needed. | Store departmentId and documentTypeId. |
| 5 | Build batch request | name, IDs, parameters, and rows. | Validate every row length and required values before calling the API. |
| 6 | Create advanced batch import | JSON request body. | Store data.id as the batch ID and store created document IDs if needed. |
| 7 | Review created batch | Batch ID or web screen /App/BatchImport. | Confirm documents, data, and signature boxes before sending. |
| 8 | Send imported batch process | Batch ID. | Documents are sent to recipients. Handle 202 by retrying after a delay. |
| 9 | Track status | Batch list, document list, or webhook depending on integration design. | Synchronize status and errors back to the customer system if needed. |
Preparing a Template File with Placeholders
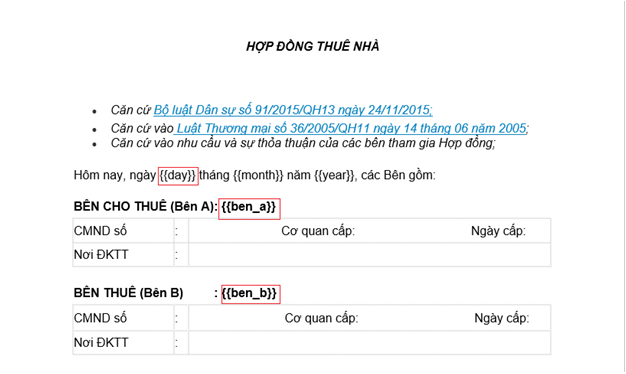
Prepare a template file (.docx format) with placeholder parameters. The variable naming convention is {{variable_name}}.
Example: a rental contract template with placeholders:
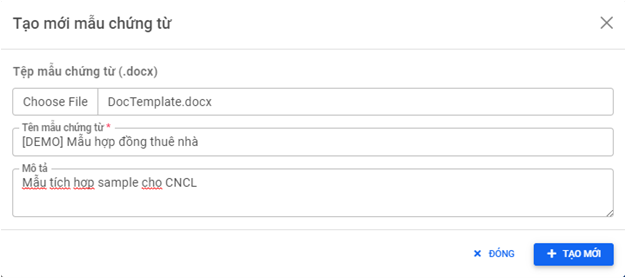
Uploading the Template File and Configuring
Log in to the VNPT eContract Web system and navigate to the document management screen /App/DocumentTemplate, then select “Create New” to upload the document template.
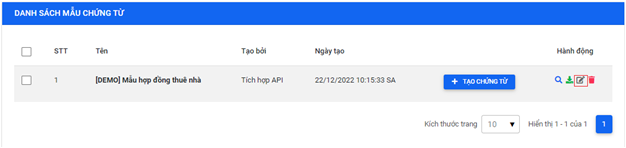
Once successfully added, proceed by selecting “Edit” to configure signature positions and parameters.
Choose "Add Signature Position" to add a signature box for the signer.
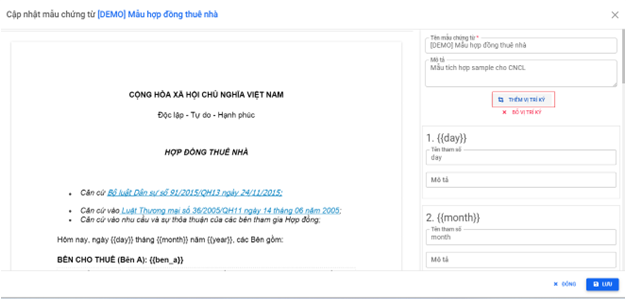
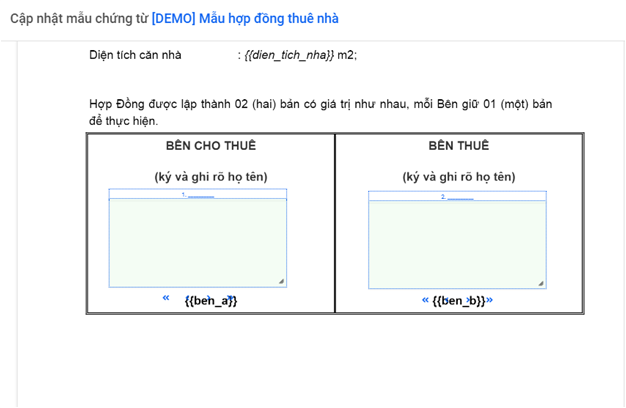
Place the signature boxes at the appropriate positions for signing; multiple signature boxes can be added. For example, adding two signature boxes at the bottom of the page, with box 1 for {{ben_a}} to sign and box 2 for {{ben_b}} to sign.
Preparing Data for Document Creation from the Template
Prepare the request data for the API call to create a document batch based on the template. The information required for creating the document batch includes:
- Document batch name
name: used to distinguish between created document batches. - Department
departmentId: specifies the department to which the document belongs, aiding in reporting. - Document type
documentTypeId: identifies the type of document to create, aiding in reporting. - Document template
documentTemplateId: specifies the template information used to create the batch. - Parameters
parameters: specifies the list of necessary parameter names for creating placeholder documents. - Data rows
rows: contains data for each row corresponding to the declared placeholders; the number of rows represents the number of documents created.
Each element in parameters maps to the value at the same index in every row. For example, if parameters[1] is {{D.No}}, then rows[n][1] is the document number for row n. If any row has a different number of values from parameters, the API cannot map the data correctly.
Below is sample request data for creating a batch with 2 documents, each requiring signatures from 2 people.
{
    "name": "Lô chứng từ trình GĐ ký ngày 23/12/2022",
    "departmentId": 33,
    "documentTypeId": 47,
    "documentTemplateId": 1140,
    "parameters": [
        "{{D.FileName}}",
        "{{D.No}}",
        "{{D.Subject}}",
        "{{D.ExpiryDate}}",
        "{{D.Description}}",
        "{{D.IsOrder}}",
        "{{P.Code}}",
        "{{P.AccessPermission}}",
        "{{P.Code}}",
        "{{P.AccessPermission}}",
        "{{ben_a}}",
        "{{ben_b}}"
    ],
    "rows": [
        [
            "DOCUMENT_2",
            "CNCL_2",
            "Đơn đặt hàng 2",
            "",
            "Mô tả abc xyz",
            "Y",
            "baoth",
            "DR",
            "baoth",
            "D",
            "Nguyễn Văn A1",
            "Nguyễn Văn B1"
        ],
        [
            "DOCUMENT_3",
            "CNCL_3",
            "Đơn đặt hàng 3",
            "",
            "Mô tả abc xyz",
            "Y",
            "baoth",
            "DR",
            "baoth",
            "D",
            "Nguyễn Văn A2",
            "Nguyễn Văn B2"
        ]
    ]
}
The parameters parameter should start with the document information fields below. Provide the correct names and keep the order consistent with the values in rows:
{{D.FileName}}: File name, the created document will be named according to the declared file name.{{D.No}}: Document code, must be unique and is used for document lookup.{{D.Subject}}: Document title, displayed on the document list screen.{{D.ExpiryDate}}: Expiry date (format dd/MM/yyyy), the document will automatically be canceled if the processing expires.{{D.Description}}: Additional description, displayed when viewing the document.{{D.IsOrder}}: Sequential processing (Y/N), used to determine if the signing process is sequential. (required)
The next pair of parameters pertains to the signing process information {{P.Code}} and {{P.AccessPermission}}. Adding more pairs will create a document batch with that many handlers.
{{P.Code}}: Recipient code, each user in the company has a unique code.{{P.AccessPermission}}: Access permission. Common values are V for view-only, D for digital signature, E for e-signature, EKYC for eKYC signature, DR for draw-sign, A for approval, F for fill data, and C for coordinate.
Lastly are the placeholders required on the document, with parameter names that must match the original variable naming convention and match the names of the parameters in the template file above. For instance, if the document template has a parameter named {{ben_a}}, the parameter name provided must exactly be {{ben_a}}.
Parameter mapping rules
| Rule | Description |
|---|---|
| System document fields | Parameters starting with {{D. define document metadata such as file name, document number, subject, expiry date, description, and processing order. |
| Workflow fields | Repeated {{P.Code}} and {{P.AccessPermission}} pairs define recipients and permissions. Add one pair for each additional processor. |
| Template placeholders | Parameters such as {{ben_a}} and {{ben_b}} must match placeholders configured in the document template. |
| Array placeholders | Use {{#items}} when the template expects repeated data. Pass the row value as a JSON string matching the template structure. |
| Row count | Each item in rows creates one document in the batch. |
| Column count | Every row must contain the same number of values as parameters. |
| Date format | Date values such as {{D.ExpiryDate}} should use dd/MM/yyyy. Leave empty only when the field is optional for the business flow. |
| Document number | {{D.No}} should be unique so the customer system can reconcile each generated document. |
- The
parameterslist cannot be changed and must follow the exact order and rules above: Basic information -> Signing process information -> Placeholder information. - The
rowsdata list: data must be provided in the same order as the parameters above. - In sequential processing, F should be placed before D, E, EKYC, and DR if the signer needs the filled data before signing.
- Use
\nin a row value when the generated document needs line breaks.
Calling the API to Create a Document Batch from the Template
Use the API (/api/batch-imports/create-advanced) to create a document batch from the prepared sample data. See details in the Advanced Batch Import API.
After the API returns success, store the following values for later operations:
| Response value | Usage |
|---|---|
data.id | Batch ID used to send the signing process and search the batch later. |
data.numberOfRecords | Number of documents requested in the batch. Use it for reconciliation. |
data.documents[].id | Document ID of each generated document. Store it if the customer system needs document-level tracking. |
data.documents[].no | Generated document number. Use it to map back to the source row. |
data.documents[].status | Initial document status before sending. |
data.errors | Row-level errors if the import fails or returns validation details. |
After successfully creating the document batch, you can check the result on the web at /App/BatchImport.

Select the “Send Process” button to view the detailed information of the created document batch.
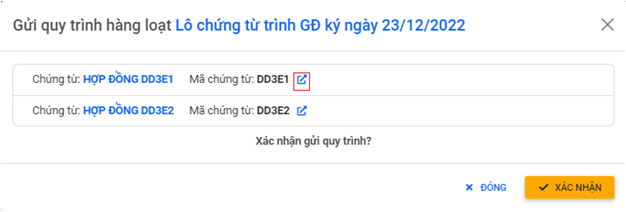
Click on the details to view information on the created documents.
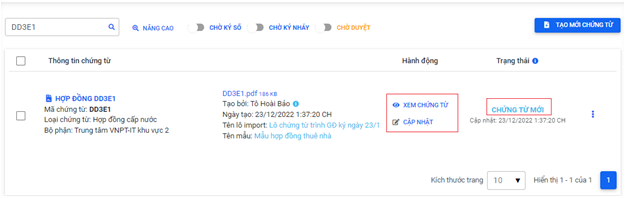
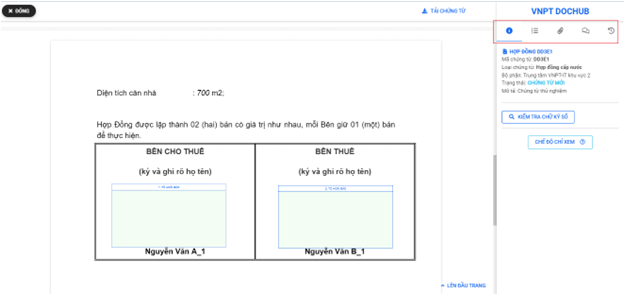
Verify the information in the created document, including signature boxes (if any). Documents that haven’t had the process sent will be in the “New Document” status. In this status, information can be updated and edited if there are any errors (update via APIs or on the web).
Sending the Signing Process
After successfully creating the document batch, the system will return the created batch ID, which is used to send the signing process. See details in the Batch Signing Process API.
Once the document batch has been sent, the documents can no longer be edited. So, ensure to check the information carefully before sending.
When the batch contains many documents, the send API can return code 202 because the generated documents are still being processed or converted. In this case, wait for a short period and call the send API again with the same batch ID. The retry interval should depend on the batch size and the customer's SLA.
Recommended implementation checklist
- Validate the template placeholders before sending real data. Use the template detail API or the template configuration screen to compare expected placeholders with
parameters. - Validate that every row has the same number of values as
parametersbefore calling the create batch API. - Validate required fields:
name,departmentId,documentTypeId,documentTemplateId,{{D.No}},{{D.Subject}},{{D.IsOrder}}, and each recipient pair. - Make
{{D.No}}unique across documents to avoid duplicate document numbers. - Store a mapping between the source row ID,
{{D.No}}, batch ID, and generated document ID. - Review created documents before sending the process, especially placeholder values and signature boxes.
- Handle retry for send API response code
202. - Synchronize status using the batch list, document list, or webhook depending on integration needs.
- Log the batch ID, document numbers, row index, and API error messages for support and reconciliation.
On the document list screen, the status of all sent documents will be visible. Select the search button to find the list of sent document batches.

The documents have been successfully sent to the recipients, who can process the received documents in batches (bulk processing).